
nickec It's possible that could work. Wouldn't the metals also have to be heated?
Brian Albiston
Verified User
- Member since Feb 9th 2015
Posts by Brian Albiston
-
-
palladium leaf is not cheap https://www.goldleaf.com.au/go…m-leaf-transfer-leaf.html
but may be one could find a reproducible way to hammer 3 or so sheets into nickel
RobertBryant, I recently tried burnishing Palladium leaf into Nickel foil using an agate burnisher. The Palladium leaf is so fragile that it quickly tears into many pieces without achieving any adhesion to the Nickel. Perhaps this isn't the best method... I could try hammering, but what do you hammer it with and how do you prevent it from attaching to the hammer instead of the nickel? I'm open to ideas.
-
What are the thoughts on why the film exposure in the Rout, Srinivasan and Garg paper required an Oxygen atmosphere to fog the films? Frank Gordon's LEC devices seem to share some components and characteristics of a fuel cell (admittedly far out of my range of expertise). It would be interesting to see if they also require an Oxygen atmosphere to "work".
-

If the temperature is measured on the outside wall, and if you wait for it to stabilize, then the internal conductivity make no difference. The outer wall will come to the same temperature no matter what. With highly conductive gas, it will reach this temperature quickly. With less conductive gas, it will take longer. The final temperature of the outside wall is a function of the power level and the total area of the outside surface only. No other parameters affect it.
The temperature inside the reactor, at the center, will vary depending on gas conductivity. Less conductive gas will make the temperature higher, after the terminal temperature is reached.
JedRothwell what you say is true, but Desireless didn't wait for it to stabilize. The plot he has shared covers a period of 20 minutes. If his reactor is anywhere near the mass of Mizuno's then it takes hours for it to stabilize. You can see it starting to head back toward equilibrium in the tail of his plot. Even in the steady state the temperature distribution will change when Deuterium is added. In vacuum much of the heat is conducted out through the heater support resulting in the heater supporting end of the reactor being relatively warm. Once Deuterium is admitted the heat distribution will change to be a more consistent temperature over the surface of the reactor. I think you agree that this makes it very difficult to use temperature only as a measurement of excess heat. You have to do calibrations with multiple temperature measurement points at each Deuterium pressure and wait hours at each power step. If Desireless would like to publish these calibrations and full pictures of his setup as others of us have then I might take his claims more seriously.
-
Unfortunately it appears Desireless is another replicator that has discovered the high thermal conductivity of Hydrogen/Deuterium and confused it as excess heat. Desireless is measuring external reactor temperature with and without Deuterium for a constant input power and is interpreting increased external reactor temperature when Deuterium is introduced as excess heat. What it appears they are observing is just the high thermal conductivity of the Deuterium increasing the heat conduction to their measurement location. You need a calorimeter for these experiments or at the very least you have to be as meticulous as magicsound.
-
I doubt a video can be made. Mizuno can't do it. I guess we could find a professional, but I am not interested in paying for anything more like that. I paid many thousands to provide screens and send out reactors and samples to people. I never heard back from most of them. One, I think, returned the reactor after a year or two of doing nothing. I guess people are busy.
JedRothwell A simple cell phone video would suffice. A professional video certainly isn't required. If Mizuno is willing I'm sure we could find someone to hold a camera. I have family living in Sapporo that I'm sure could be convinced to assist for free. There is just so much captured in a video that can't be captured in a write-up or requires a replicator to scan through 2300+ comments to find. magicsound and I have followed the replication documents as closely as possible without success likely due to undocumented steps, methods or techniques. If replication truly is a goal then a video of the process would be huge in helping to achieve that. Thanks for all of your hard work and help in this process so far.
-
Ah. That I do not know about.
Anything else?
I would like to echo magicsound 's request to know the details of how the heater is configured and mounted including what kind of vacuum pass-through is used. Pictures would be wonderful.
In addition:
- Full details on Mizuno's Palladium source, composition and annealing procedure.
- More detail on the sanding procedure. How many sanding strokes or how much sanding time on each side of the mesh? Is one sheet of sand paper used for all the meshes, one mesh or just one side of a mesh?
- A video of the full mesh preparation process would do wonders for answering our replication questions.
-

Last night...
.
Paradigmnoia, is there somewhere we can find a concise description of your setup without scrolling through this whole thread? I can't remember what you're using for temperature sensors, but it looks like you're getting stray noise building up causing that jump in temperature. I was having the same issue and found that putting a large value resistor (>100K) to ground at the ADC input made it go away. I also found that analog low-passing my signals really cleaned them up as well.
-
Thank you magicsound. Very useful analysis. Have you tried an oxidized region as can and Storms have suggested?
-
How about age hardening the Ni mesh, rather than (Or in addition to) annealing the Pd?
That may help, but the main problem is that mesh is fragile. It's easy to rip in both the sanding process and the burnishing process. Hardening the mesh may help the Pd deposition go faster, but you still are working with a very fragile substrate. After spending several entire weekends struggling with meshes, a more durable substrate is sounding very attractive. I'm sympathetic to Storms argument that at an atomic or nano scale it makes no difference whether it is mesh or foil.
-
-
Thank you for your interest. I've completed a second round of Mizuno style mesh testing. Again, no departure from calibration was seen on the "active" run.
For this round of testing the calorimeter received the following upgrades:
- An additional mass airflow sensor was added to the calorimeter to allow for slightly higher airflow. The calorimeter now has 5 mass airflow sensors to continuously monitor airflow. Each sensor can be compared with calibration and its companions to ensure no outlying measurements. Analog low pass filtering was increased to provide steady airflow measurements.- The inlet and outlet temperature is now measured using Silicon and RTD redundant temperature sensors. Different temperature measurement technologies/principles are used to increase measurement confidence. The temperature sensors have been better isolated from the environment to reduce sensitivity to ambient temperature fluctuations.
The result is the calorimeter performs very repeatable measurements with very little influence from ambient conditions. I have very high confidence in the measurements.
For this test two meshes were prepared according to standard Mizuno instructions and two meshes were prepared with Calcium Carbonate enriched hot soak water as my tap water is naturally very low in this mineral. The Calcium Carbonate enrichment seemed to have no effect although I do not have an SEM to test if any crystals were actually deposited on the mesh.
I still find it extremely difficult to deposit the proscribed amount of Palladium on the mesh without ripping the mesh to pieces first. I was able to deposit 10-20 mg per mesh after many hours of rubbing. My Palladium was factory annealed. One key seems to be having absolutely no sharp edges on the Pd sample like Mizuno's well rounded sample.
I completed several rounds of vacuuming (at least 10-5), heating, adding D2, heating, repeat over the course of 2 weeks of testing.
-
Thanks for your interest Alan Smith. I found several calorimeter performance issues I wasn't happy with on my last round of testing so I am currently in the midst of performing calorimeter upgrades. When the upgrades are complete a re-calibration will be required.
- I've added an additional mass airflow sensor to allow slightly higher airflow. This should allow power levels up to ~500 W to be tested without exceeding the maximum temperature of the calorimeter components.
- I'm in the process of adding RTD input and output temperature sensors in addition to the existing silicon temperature sensors for redundant temperature measurement.
- I'm working to better isolate the temperature sensors from the environment. I found that, counter to intuition, when the ambient temperature would drop the recovery/COP would improve. I believe this is because the inlet temperature sensor wasn't sufficiently isolated so the cool ambient air would result in a biased low inlet air reading. The effect was minor but I would like to eliminate it if I can.
- The additional instrumentation requires more ADC channels than my Labjack has so I'm also adding additional ADC channels through I2C and SPI interfaces.
Unfortunately, upgrades like this take a substantial amount of time which always seems to be in short supply.
-
A huge thank you to Alan Goldwater magicsound for SEM and EDX analysis of my prepared mesh samples. As suspected, very little Pd was deposited. Alan's conclusions were:
1. The water used in the 1-hour soak at 90°C may have had insufficient Calcium. It should be >40 mg/l to follow the Mizuno recipe. Or cleaning after the soak may have removed the deposits. No post-soak cleaning should be done other than a dip in alcohol to remove trace water.
2. The palladium used to rub the mesh was too hard or too small in contact area. It should be annealed and shaped so that a flat surface is presented squarely to the mesh when rubbing. It helps to clamp the mesh to a piece of plate glass or glazed tile across one entire edge, then rub the Pd only away from the clamped edge. Treat each of the four directions on each side this way. This should prevent wrinkling or stretching the mesh.
3. Avoid using anything like a soft sponge that might leave organic deposits lodged in the mesh. The abrasive side of a “scotchbrite” pad should be OK if not used aggressively
-

The calibrations you show seem to be for reactor temperatures that are substantially lower than those where Mizuno and Rothwell claim to detect excess heat production. What temperature ranges are you using for your fueled runs? .
Bruce__H, Here are the reactor heater internal temperature and the reactor external temperatures. The reactor external temperatures are displayed as the blue and green lines. The blue line pretty much overlays the green. The "gas end" thermocouple is located on the end of the reactor closest to the 1/2" vacuum/gas connection. The "heater end" thermocouple is located on the end of the reactor closest to the heater connection.
-
What is the typical air volume rate going through the calorimeter?
Total air volume is in the 450 SLPM range for a blower voltage of 12.5V. I don't try and control blower power, but I assume it is fairly constant.
-
So, back to the MAFs, they are small diameter compared to the outlet tube, so how do you deal with that?
I'm not sure I understand your question. I don't do anything to account for the MAFs small diameter other than I require four of them to allow sufficient air flow because of the back pressure they create. If I had a stronger blower I could probably get away with two MAFs. All of the calorimeter exit air passes through the MAFs. I hope that answers your question.
-
Did you standardize to STP mostly because the mass air flow sensors report in STP?
If you have more details on the mass airflow set up I would appreciate it, if you have the time.
Paradigmnoia Yes, that is correct. I standardized to STP because that is what the sensors report in. I have a hot wire anemometer, but the mass air flow (MAF) sensors are so much more convenient.
I've found the MAF sensors to be very repeatable, but I also discovered the absolute accuracy isn't great by comparing the sensors with each other.
This is corroborated by the datasheet (which I had overlooked that detail when I chose them). What really matters is repeatablity, since I can calibrate the absolute accuracy, and in this they excel. I would bet it would be difficult to achieve such repeatability with hot wire anemometer traverses.
The four sensors are mounted in parallel downstream of the outlet temperature sensor.
-

Since you are on the MFMP team, and accompanied BG to test me356 's reactor, can I ask if we can consider this an official MFMP Mizuno/R20 replication attempt? And if so, are you working alone?
Shane, you are correct that I've volunteered for the MFMP in the past and was part of the me356 testing team. This is not an MFMP test. I am working alone and being assisted with funding by my FluxHeat business partner. He wishes to maintain anonymity at this time. We feel it is in the spirit of Mizuno's generosity and openness to be as open with this testing as possible though.
-
For the test I am currently running 4 meshes were prepared according to the Mizuno/Rothwell Materials and Methods supplement to the best of my ability. A couple of notes and observations in the material preparation:
- I used Dawn dish detergent.
- The sanding step is very difficult. Holding on to the meshes while sanding in a tub of water is not trivial. This sanding step is I'm sure a huge source of variability in material preparation.
- I did not have an accurate way to determine how much Palladium was applied, if any. I will seek to improve this and also seek for SEM analysis of my prepared mesh samples to determine how much Palladium I am depositing.
- I pumped the reactor down for 3 days prior to introducing D2. My turbo is old though and probably takes longer than a newer unit. I also do not currently have any way of baking my external plumbing so it was difficult to get all of the water out.
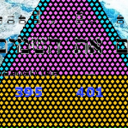
This scan was taken just prior to the valving off of the vacuum pumps and introducing D2.
The Pirani and Cold Cathode units are in mTorr. I don't know what the Y-axis is on the RGA scan, but the relative peaks show that it was mostly H2 left in the reactor prior to stopping pumping.
After several days of testing I have seen no excess yet. I am now doing a second pump down and bake out which will likely last another several days.